No pile from a dug post hole.
At a directly driven support, there is no full post hole to excavate and no hole-sized pile of soil to spread or haul away. That keeps more of the surrounding lawn in place.
The installation makes the difference
Enjoy your new fence without a row of excavated post holes and piles of spoil at the driven-post locations. A compatible steel support system gives your fence its backbone, with less soil to move and less cleanup around those posts.
Inside a steel-supported vinyl post
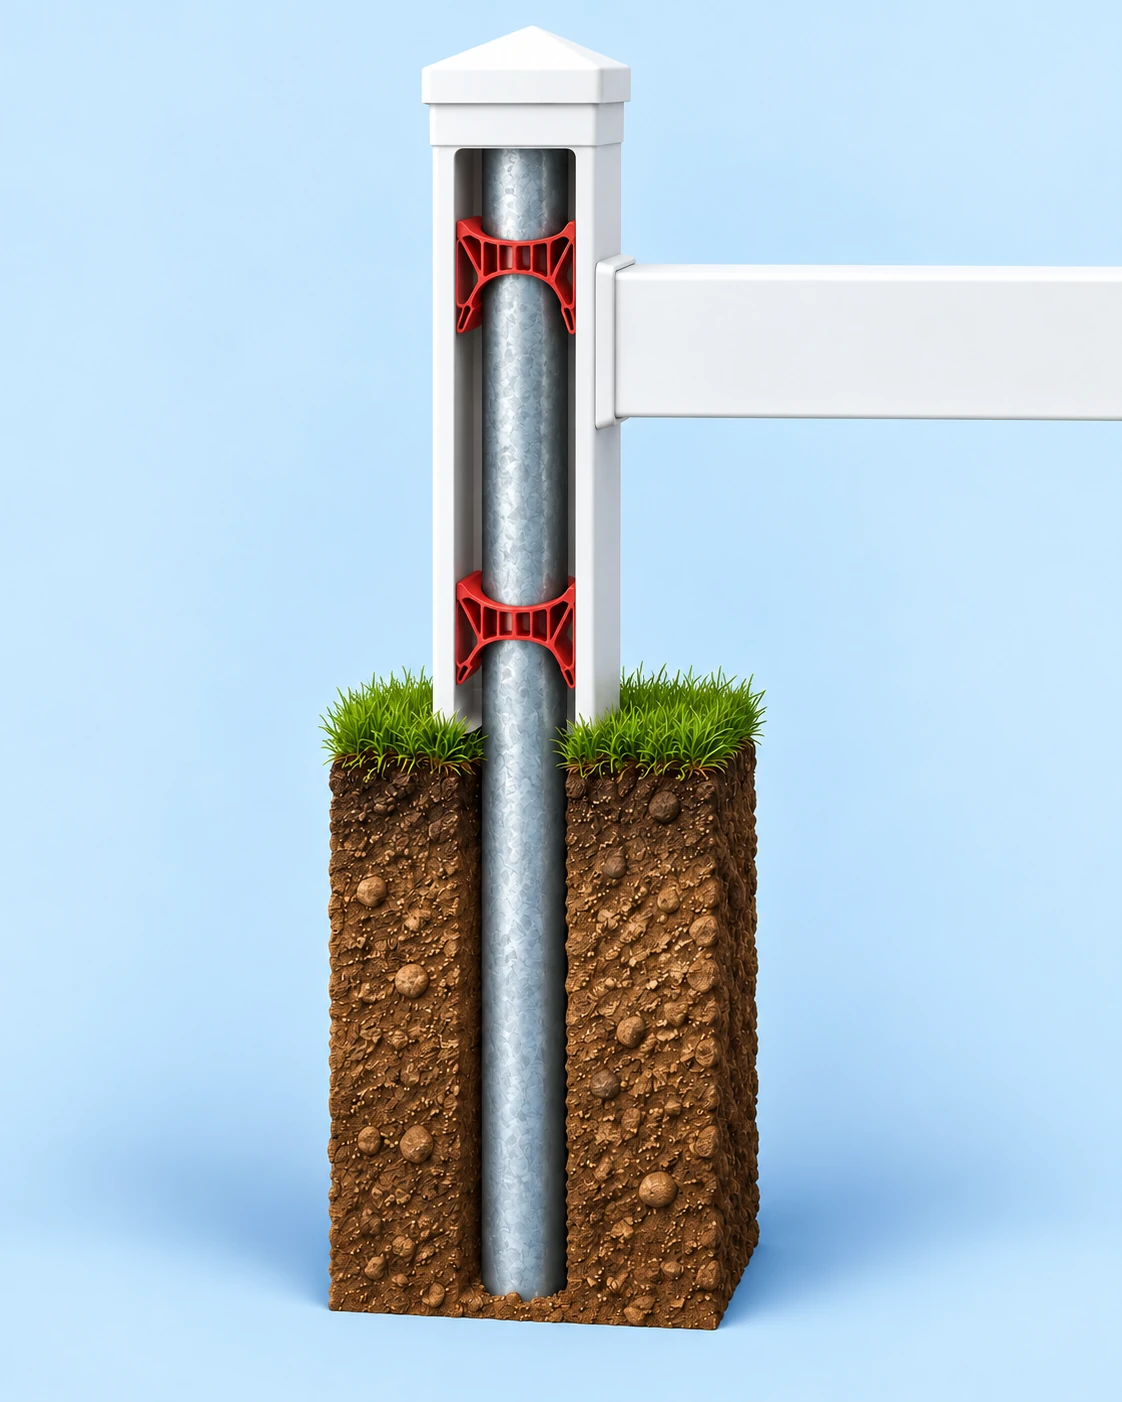
The details behind your fence
Follow a driven post from the reviewed layout to the finished fence. Select a stage to move the illustration.
After the layout and utility checks, position the specified steel support at the planned post location.
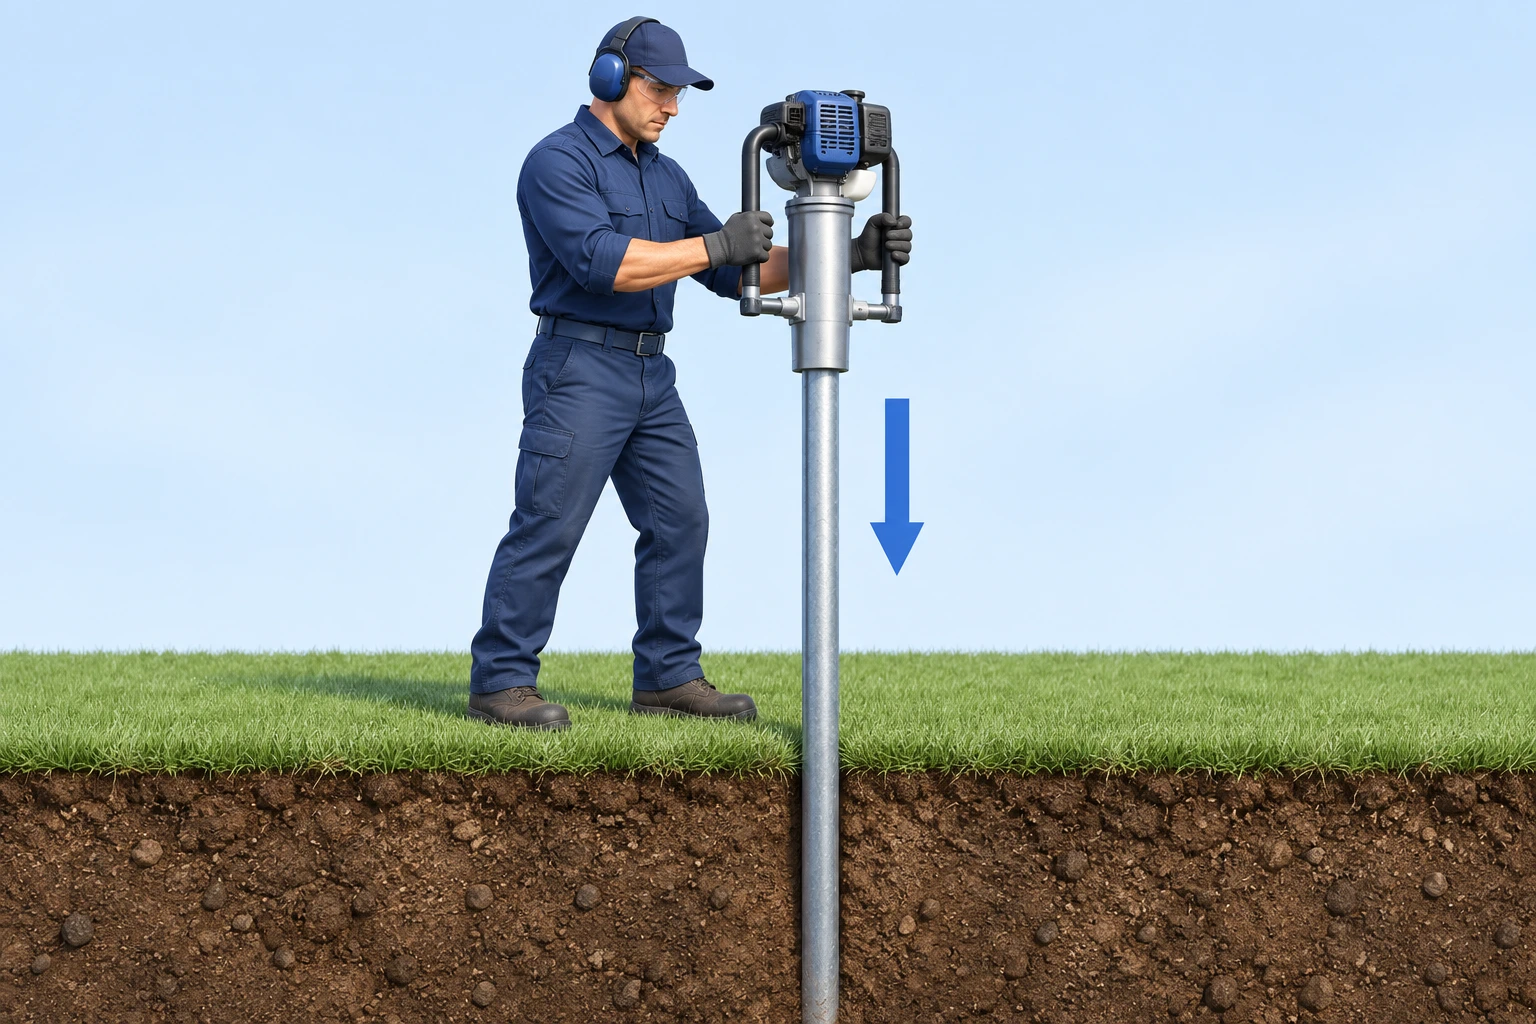
The driver advances the support into the ground. Required embedment depends on the system, soil, height and loads.
Fit the compatible post assembly, rails and fence finish. Gate supports receive their own review.
The details behind your fence
Compare the ground work at one post location before final cleanup.
A directly driven support avoids excavating a full footing-sized hole at that location. There is no hole-sized pile of spoil to remove.
Excavation removes soil to make space for the specified footing. That soil needs spreading, removal or other cleanup. Both methods still need a tidy final walkthrough.
From layout to final walkthrough
We review where the fence will run, how gates will be used and what access the installation needs. The shared site plan gives you a clear starting point.
Before driving begins, confirm the required approvals and utility locating. Review ground conditions, obstructions, post spacing and the support detail for the selected fence.
A post driver advances the steel support into the ground. The required embedment and installation procedure come from the selected system and site requirements—not a one-depth-fits-all rule.
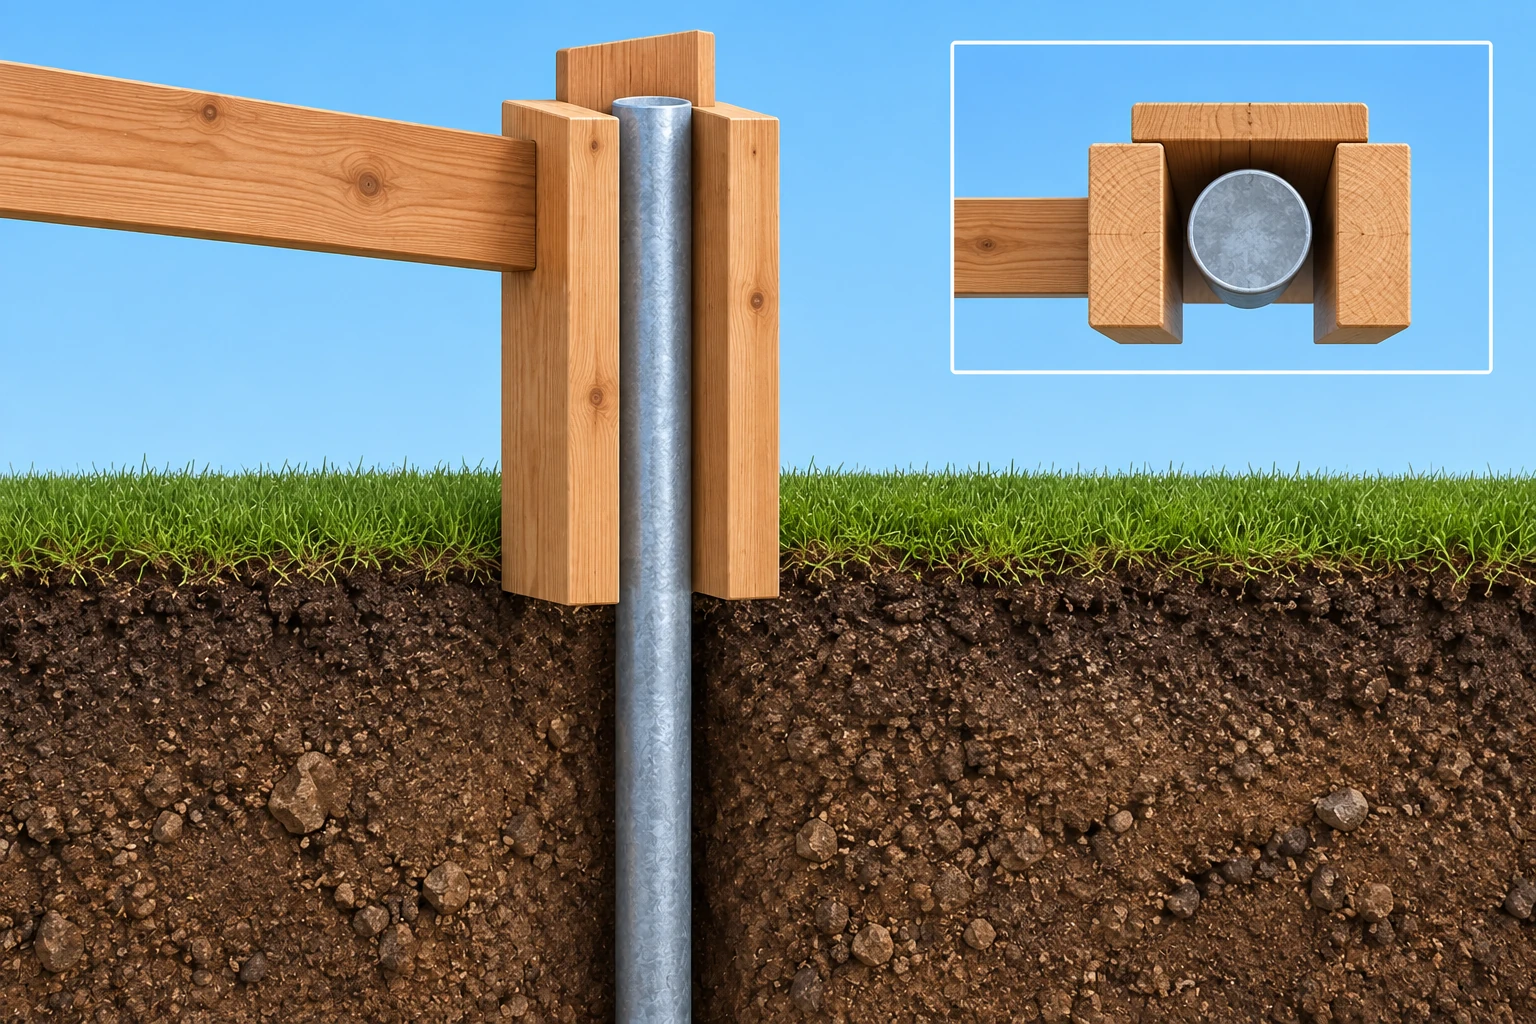
For vinyl, fit the Ridge X adapters and vinyl sleeve to the steel pipe. For King Plus wood fencing, build the U-shaped wood box, fit it around the driven support and align it before adding the rails. Follow the fastening detail selected for the project.
Attach the selected panels or rails and fit the gate hardware. Gate posts and wide openings receive the support detail required for their loads.
Review the fence line, finish and gate operation together. Keep the shared scope, plan and questions with your project in the customer portal.
A smaller excavation footprint
At a directly driven support, there is no full post hole to excavate and no hole-sized pile of soil to spread or haul away. That keeps more of the surrounding lawn in place.
Where the approved system uses no poured footing, there is no concrete to mix, move or wait to cure at that post. Removal work, gates or other site details may still need excavation.
A narrow driven support avoids opening a larger footing-sized hole. We still plan access, protect the work area and clean up after installation—especially when an old fence is being removed.
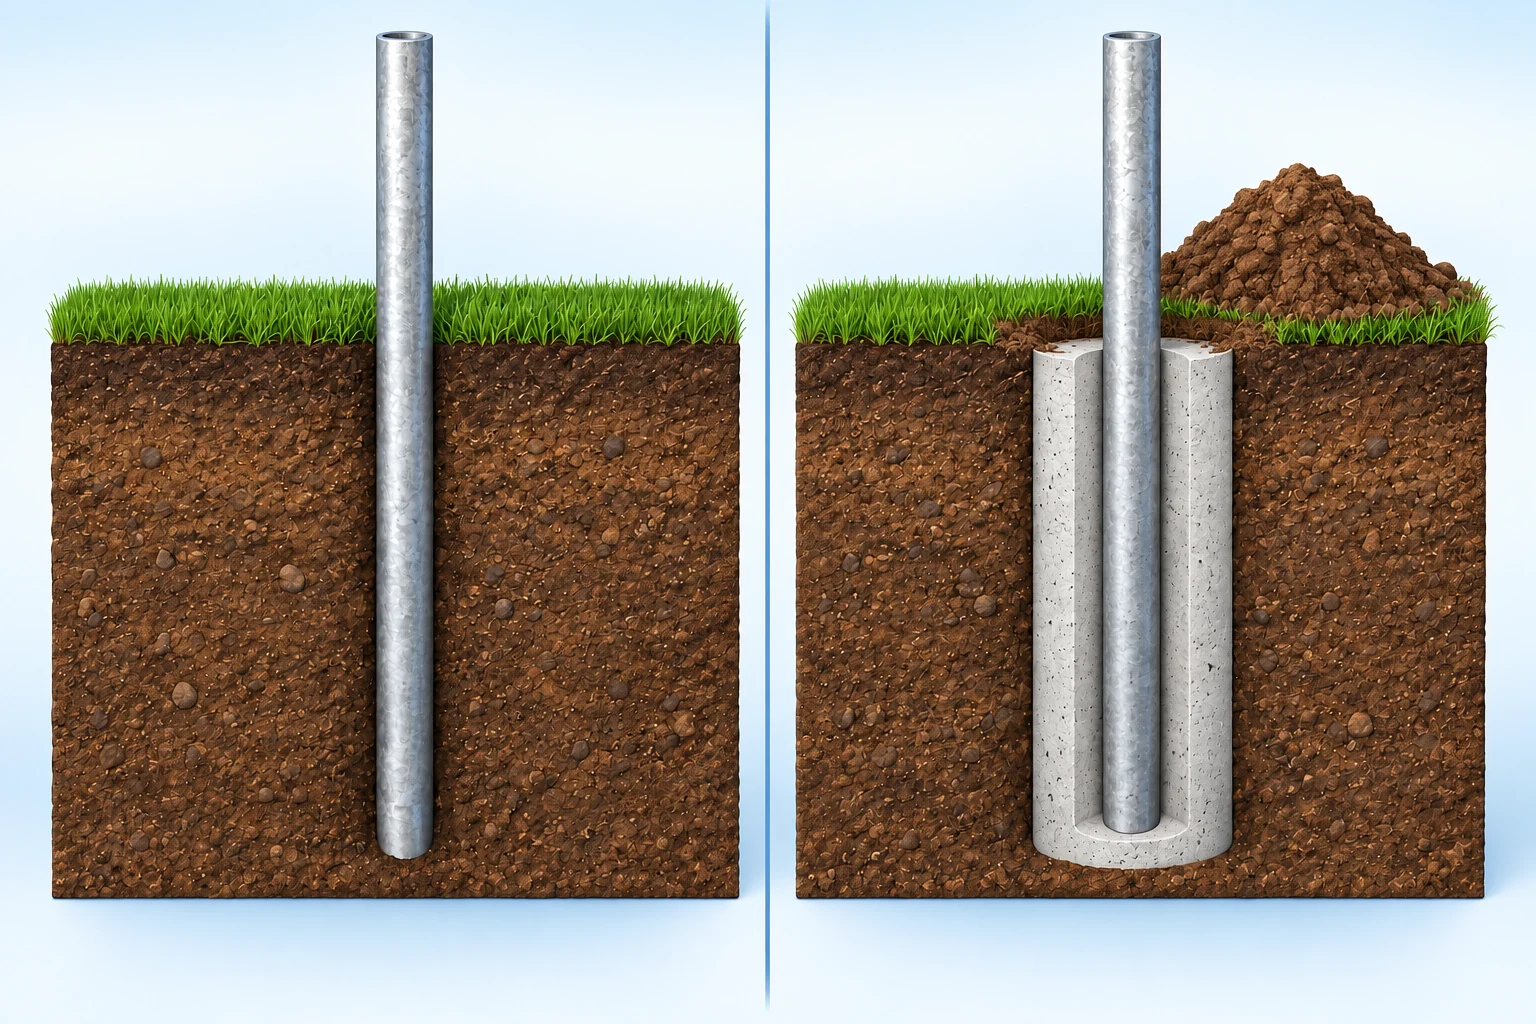
No excavated post-hole pile at this location.
Removed soil needs spreading, removal or other cleanup.
The support is more than the finish you see
GFS uses Ridge X adapters from Central Fence Supply between the steel pipe and vinyl post sleeve. The composite adapters have openings for rail clearance and a square outer fit that helps keep the sleeve aligned. The pipe, adapters, fasteners, rails and panels work together as a system.
Strength comes from the complete specified assembly: steel size and wall thickness, embedment, soil, connections, fence height and gate loads. Some conventional vinyl systems also use reinforcement, so we compare the actual systems rather than the outer appearance alone.
GFS uses the King Plus method for wood fencing: one picket and two vertical 2×4s form a U-shaped box around the driven steel support. We build and align the box before attaching the fence rails. The steel provides the ground-contact support; the wood components still need appropriate care.
The ground line is an important place to inspect a wood post for decay and loss of section. A protected steel post addresses that wood-decay mechanism; its coating, connections and condition still matter over time. Galvanizing provides zinc protection, while soil conditions and coating condition influence corrosion performance.
The right method starts with the site
We plan individual post positions around the confirmed site constraints before installation. A narrow support uses a smaller footprint than an excavated footing, but it cannot detect or safely pass through a buried utility.
No-dig still disturbs the ground. Before posts are driven, the crew needs the required 811 notification, utility responses and any necessary private-line locating. Near marked lines, follow the required clearance and exposure procedures; change the layout or method when needed.
Think beyond the first set of panels
If the steel supports remain sound and suit the next fence, it may be possible to replace boards, rails or panels while retaining them. That can avoid some post removal, disposal and reinstallation work.
Check corrosion, movement, damage, alignment and connections. A post that is leaning or deteriorated is not automatically a candidate for reuse.
Confirm spacing, height, gate loads, fittings and the support requirements for the replacement fence. A change of style may need different posts.
Compare a reuse option with a full replacement in the written proposal. Savings depend on how much sound structure can actually stay.
A durable steel support can outlast replaceable wood components. Future reuse and lower replacement cost are possibilities to evaluate—not a lifetime guarantee or a fixed discount.
Talk through a longer-term fence planThe fence support is driven into the ground instead of being placed in an excavated, concrete-filled post hole. It describes the post installation method. The fence material and finish are separate choices.
No. The selected post system, soil, obstructions, fence height and gate loads all matter. We review the proposed method for your project and explain where a different foundation detail is needed.
No. The layout, property-line information, easements, underground utilities and required approvals still need review before installation. Parcel mapping helps with planning but does not replace a boundary survey.
The finished style depends on the compatible fence system. Tell us whether you want privacy, an open view or a particular gate, and we will review suitable materials and support details together.
Directly driven supports avoid the excavated dirt piles and concrete handling associated with those post holes. Old-fence removal, access, obstructions and other project details can still disturb the yard. The proposal should describe removal and cleanup.
Steel reinforcement is part of the support system, but performance depends on the complete assembly and installation. Ask which post, coating, fittings and gate details are specified. Compare any tested rating only for the exact system and conditions it covers.
Possibly. Retaining sound, compatible supports can reduce replacement work. Their condition, spacing, alignment and suitability for the new fence need inspection before reuse or savings can be confirmed.
No. A driven post can damage buried utilities. Required utility notification, responses, private-line locating and safe working procedures still apply before installation.
GFS has confirmed Ridge X adapters for vinyl and the King Plus method for wood. Central Fence Supply describes the Ridge X adapter family and publishes fastening instructions and warranty conditions. Mr. Fence Tools explains the King Plus wood-box construction; its King Plus demonstration and additional installation demonstration show the method. Exact components, dimensions and installation details are confirmed in the project scope. For utility planning, see OHIO811 private-line guidance and MISS DIG 811 homeowner guidance. For material behavior, see the USDA wood-fence durability guide and American Galvanizers Association coating explanation.
Care on the job
“They were on time, professional, and clean.”